
Deep Reese Bass Sound Design 101
This Reese bass is deep, sinister, and foundational. It’s the kind of low end that immediately sets the mood of a track, anchoring everything above it while still leaving room to adapt and evolve inside a mix.
“One of those really deep and sinister basses that just sets a really good foundation for your track.”
The sound itself is flexible. It can be clean and controlled, or pushed into something aggressive and gritty depending on how it’s filtered, saturated, and automated. In a mix, it sits comfortably while still commanding attention, making it suitable for a wide range of genres and arrangements.
Initializing the Patch and Choosing the Core Waveform
Everything starts from a blank slate.
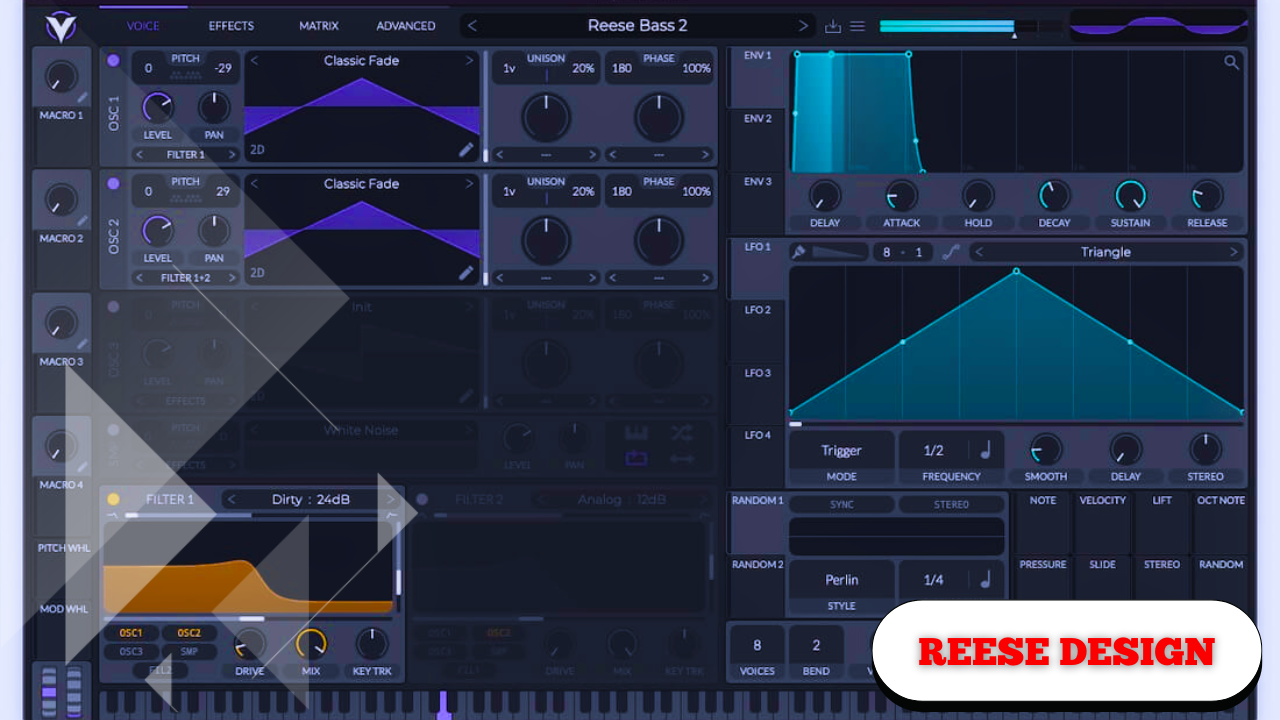
Initialize the preset and move straight to Oscillator A. Instead of staying with a basic waveform, switch to a spectral wavetable and select Ricci Mass. On its own, this wavetable sounds relatively thin at first, but that’s exactly why it works well as a starting point.
Pitch Oscillator A down two octaves. This immediately places the sound in proper bass territory and gives it weight.
Shaping the Low End With Filtering
Before adding complexity, remove unnecessary high-frequency content.
Activate the filter and switch it from MG Low 12 to MG Low 24. This steeper slope helps tame the buzz and focus the sound.
Set the cutoff around 300–400 Hz as a starting point. This value isn’t fixed; it’s just a reference that will be adjusted later as the sound develops.
The result is a cleaner, darker tone that’s ready to be built upon.
Adding Width With Unison (Without Fear)
Return to Oscillator A and increase the unison voices to five.
There’s often a strong argument for keeping bass sounds strictly mono, and in many cases that approach works. But sound design doesn’t have strict rules. Stereo space can be used creatively, even in the low end.
Set the unison detune to around 0.1. This keeps the bass solid and focused while still adding subtle width and movement.
Increase the oscillator level so the signal is strong and present.
Next, slightly adjust the fine-tune, somewhere between 0 and 10 cents. This becomes important once a second oscillator is introduced, as it creates gentle movement and interaction between the layers.
Improving Sound Quality at the Global Level
Before continuing, open the Global tab and set the oscillator quality to 4x.
This uses more CPU, but the payoff is significant. The bass becomes smoother, deeper, and more refined. If there’s one type of sound worth pushing your system a bit harder for, it’s the bass.
“If you can choose one of your Serum patches to max out your CPU on, make it the bass.”
Introducing Oscillator B for Texture and Contrast
Turn on Oscillator B and make sure both A and B are routed through the filter.
Switch Oscillator B to an analog wavetable and choose Surround. To clearly hear its contribution, temporarily mute Oscillator A and listen to B on its own.
This oscillator adds:
- More texture
- More upper harmonic content
- A subtle midrange presence
Pitch Oscillator B down one octave, not two. This contrast is intentional.
Adjust the wavetable position until the sound becomes more saturated and harmonically rich.
Just like Oscillator A:
- Set unison to five voices
- Set detune to 0.1
Turn Oscillator A back on and listen to the combined sound. The result is a full, balanced, and layered bass with a strong low end and a supportive midrange.
You can experiment with pitching Oscillator B down an additional octave if desired, but keeping it at one octave lower creates a useful tonal contrast.
Controlling Note Behavior With Mono and Portamento
Move down to the voicing controls.
Enable Mono mode so only one note plays at a time. This prevents overlapping notes from clashing and keeps the bass line tight and intentional.
Adjust the portamento to a moderate value. This allows notes to slide smoothly into one another.
With portamento:
- Notes glide
- Transitions feel fluid
Without portamento:
- Notes cut sharply
- The bass feels more aggressive
Both options are valid. The choice depends entirely on the musical context.
Adding Drive, Saturation, and Attitude
At this point, the bass is clean and versatile—but it’s time to give it personality.
In the filter section:
- Increase the Drive to add saturation and thickness
- Adjust the Fat control to reinforce low-end weight
This immediately introduces grit and attitude without destroying clarity.
Expanding Character With Distortion
Move into the effects section.
Add a distortion effect—tube distortion works particularly well. Push the drive up while pulling the mix down to blend the distortion subtly with the clean signal.
On its own, this distortion may sound extreme or even broken. But context changes everything.
What feels like too much in isolation often sounds perfect inside a full mix.
Within a track, the distortion adds:
- Character
- Aggression
- Presence
Further EQ or filtering can be applied afterward to fine-tune the low end or tame highs, depending on the song.
Bringing the Sound to Life With Modulation
The patch is now functional, but movement is what gives it a professional feel.
Set up LFO 1 and assign it to the filter cutoff. Pull back the modulation amount so the movement is subtle.
Set the LFO rate to 1/2 and listen as the filter gently opens and closes in time.
This creates a pulsing motion that helps the bass breathe and interact with the rhythm.
Understanding the Modulation Matrix
The modulation matrix shows the connection clearly:
- Source: LFO 1
- Destination: Filter cutoff
- Amount: Adjustable for fine control
Changing the rate to 1/4 or experimenting with different depths gives a surprising amount of control over the groove and feel.
Many powerful patches start simply on the front panel. The complexity lives in the matrix—small, almost invisible movements that add polish without overwhelming the sound.
Tiny modulations can turn a clean patch into something that feels alive.
Envelope Adjustments for Clean Playback
The ADSR envelope remains mostly untouched.
Two small adjustments can prevent unwanted artifacts:
- Slightly increase the attack if you hear clicking at the start
- Add a small amount of release if notes click at the end
These changes work across nearly any synthesizer and help maintain smooth playback.
Final Tone Shaping With Cutoff and Resonance
One of the most powerful aspects of this bass is how responsive it is to simple adjustments.
By tweaking:
- Filter cutoff
- Resonance
You can radically change the tone without rebuilding the patch. The bass can feel darker, brighter, tighter, or more open depending on how it’s placed against the track.
Managing Stereo Width in the Mix
A wide bass can raise concerns, especially in the low end.
If the side channels feel too heavy:
- Use a mid/side EQ
- Cut everything below ~100 Hz on the side channels
- Keep the mono center dense and focused
This preserves clarity while maintaining the character of the stereo movement.
That said, there are no absolute rules. Many great mixes break conventions and still work beautifully. Experimentation remains a core part of sound design and mixing.